step by step tutorial on how to develop a responsive website using Node.js, Express Framework and Twitter Bootstrap
Following my previous tutorial on setting up a Node.js project using Eclipse IDE which incredibly can fast track our web development; I’m gonna show you the steps to build a responsive website using the famous front-end framework Bootstrap.
Prerequisites
I assume that you have basic knowledge about Bootstrap. If not, read more here; and also you already have followed my previous tutorial and your project template is ready.
Node Project Structure
Quick fix for .ejs files syntax highlighting
Open the index.ejs file inside views folder in your project. You will see that the Eclipse shows HTML code inside our ejs file as a plain text and not coloured coded. To fix this open preferences window from Eclipse menu bar; Eclipse > Preferences
Then click on Content Types > HTML

Eclipse Preferences
Next click Add button and in the popup window add the .ejs extension and click ok.
This was one time requirement, from now on Eclipse will treat .ejs files as normal HTML files with proper coloured codings.
Setting up the Views
Under the Project Explorer open index.ejs file and copy & paste the following codes into your index.ejs file.
<!DOCTYPE html>
<html lang="en">
<% include header %>
<body>
<% include navbar %>
<!-- Main jumbotron for a primary marketing message or call to action -->
<div class="jumbotron">
<div class="container">
<h1>Hello, world!</h1>
<p>This is a template for a simple marketing or informational
website. It includes a large callout called a jumbotron and three
supporting pieces of content. Use it as a starting point to create
something more unique.</p>
<p>
<a class="btn btn-primary btn-lg" role="button">Learn more
»</a>
</p>
</div>
</div>
<div class="container">
<% include content %>
<hr>
<% include footer %>
</div>
<!-- /container -->
<script type="text/javascript">
$(document).ready(function() {
$('#home').addClass("active");
});
</script>
<!-- Bootstrap core JavaScript
================================================== -->
<!-- Placed at the end of the document so the pages load faster -->
<!-- jQuery (necessary for Bootstrap's JavaScript plugins) -->
<script src="https://code.jquery.com/jquery.js"></script>
<!-- Latest compiled and minified JavaScript -->
<script
src="//netdna.bootstrapcdn.com/bootstrap/3.0.3/js/bootstrap.min.js"></script>
</body>
</html>
Adding header section
Create a new file under Views folder and name it header.ejs by right clicking on Views folder and New > file then copy following codes into it. This file will be used as typical html header. The reason we are separating these sections are to make our coding more clean and easier to debug in future.
<head>
<meta charset="utf-8">
<meta name="viewport" content="width=device-width, initial-scale=1.0">
<meta name="description" content="">
<title><%= title %></title>
<link rel='stylesheet' href='/css/stylesheet.css' />
<!-- Latest compiled and minified CSS -->
<link rel="stylesheet" href="//netdna.bootstrapcdn.com/bootstrap/3.0.3/css/bootstrap.min.css">
<!-- Optional theme -->
<link rel="stylesheet" href="//netdna.bootstrapcdn.com/bootstrap/3.0.3/css/bootstrap-theme.min.css">

<!-- HTML5 shim and Respond.js IE8 support of HTML5 elements and media queries -->
<!--[if lt IE 9]>
      <script src="../../assets/js/html5shiv.js"></script>
      <script src="../../assets/js/respond.min.js"></script>
    <![endif]-->
</head>
Adding a navigation bar
Now create a new file again in Views folder and name it navbar.ejs . In this file we define the structure of the Navigation bar. Copy and past following:
<div class="navbar navbar-inverse navbar-fixed-top">
	<div class="container">
		<div class="navbar-header">
			<button type="button" class="navbar-toggle" data-toggle="collapse"
				data-target=".navbar-collapse">
				<span class="icon-bar"></span> <span class="icon-bar"></span> <span
					class="icon-bar"></span>
			</button>
			<a class="navbar-brand" href="#"><%= title %></a>
		</div>
		<div class="navbar-collapse collapse">
			<ul class="nav navbar-nav">
				<li id="home"><a href="/">Home</a></li>
				<li id="about"><a href="/about">About</a></li>
			</ul>
		</div>
		<!--/.navbar-collapse -->
	</div>
</div>
Adding content section
Now it’s time to add some content to our website. Create a new file and name it content.ejs and copy following code:
<!-- Example row of columns --> <div class="row"> <div class="col-md-4"> <h2>Heading</h2> <p>Donec id elit non mi porta gravida at eget metus. Fusce dapibus, tellus ac cursus commodo, tortor mauris condimentum nibh, ut fermentum massa justo sit amet risus. Etiam porta sem malesuada magna mollis euismod. Donec sed odio dui.</p> <p> <a class="btn btn-default" href="#" role="button">View details »</a> </p> </div> <div class="col-md-4"> <h2>Heading</h2> <p>Donec id elit non mi porta gravida at eget metus. Fusce dapibus, tellus ac cursus commodo, tortor mauris condimentum nibh, ut fermentum massa justo sit amet risus. Etiam porta sem malesuada magna mollis euismod. Donec sed odio dui.</p> <p> <a class="btn btn-default" href="#" role="button">View details »</a> </p> </div> <div class="col-md-4"> <h2>Heading</h2> <p>Donec sed odio dui. Cras justo odio, dapibus ac facilisis in, egestas eget quam. Vestibulum id ligula porta felis euismod semper. Fusce dapibus, tellus ac cursus commodo, tortor mauris condimentum nibh, ut fermentum massa justo sit amet risus.</p> <p> <a class="btn btn-default" href="#" role="button">View details »</a> </p> </div> </div>
Finally we add the footer. create a new file and name it footer.ejs and copy following:
<footer>© Company 2013</footer>
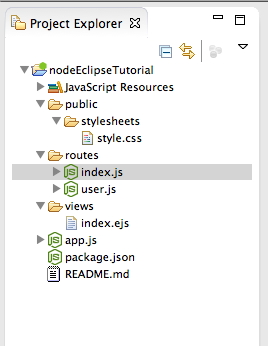
By now your project structure should look like this:

Views
Click on the Green Run button on Eclipse toolbar to run the Node server then go to http://localhost:3000 to see your changes which should look like this:

landing page
Creating a new route and adding a About page
In order to add a new page to our project like about page we need to first define a routing such as http://localhost:3000/about To do this open app.js file. As you should know this is where we configure the Node.js server. Add the following in app.js file before createServer method:
var about = require('./routes/about');
app.get('/about', about.about);
Create a new js file under the routes folder and name it about.js then add the following code:
exports.about = function(req, res){
res.render('about', { title: 'Express' });
};
This is how we command Node server to render a page view. To learn more about this method read the Express documentations. Now that the routing is setup we just need to add the view for the about page. Create a new file under Views folder and name it about.ejs. We’re gonna use the same template as index.ejs to make our about page. Add the following into about.ejs file:
<!DOCTYPE html>
<html lang="en">
<% include header %>
<body>
	<% include navbar %>

	<div class="container">
		<div class="page-header">
			<h1>
				About <small>What we aim for!</small>
			</h1>
		</div>
		<div class="panel panel-default">
			<div class="panel-heading">About Us</div>
			<div class="panel-body">
				<p>My tutorial on how to use bootstrap to create a responsive
					website.</p>
			</div>
		</div>

		<hr>

		<% include footer %>
	</div>
	<!-- /container -->
	<script type="text/javascript">
		$(document).ready(function() {
			$('#about').addClass("active");
		});
	</script>
	<!-- Bootstrap core JavaScript
    ================================================== -->
	<!-- Placed at the end of the document so the pages load faster -->
	<!-- jQuery (necessary for Bootstrap's JavaScript plugins) -->
	<script src="https://code.jquery.com/jquery.js"></script>
	<!-- Latest compiled and minified JavaScript -->
	<script
		src="//netdna.bootstrapcdn.com/bootstrap/3.0.3/js/bootstrap.min.js"></script>
</body>
</html>
Restart the node server and navigate to /about. You should see the about page and can use the navigation bar.

about page
That’s it. You can use the same steps to create different pages for your website.
Download the Source Code: nodeEclipseTutorial
Read the Bootstrap documentations to create great looking front-end component such as tables and forms. Also read Express js documentations to more.
Bootstrap documentations: http://getbootstrap.com/getting-started/
Express documentations: http://expressjs.com/api.html
If you found this useful please let me know by subscribing and sharing this tutorial using social medias. 🙂

It doesn’t appear the .ejs extension, what i have to do?
When I try to run the website, I get this error:
500 Error: ENOENT: no such file or directory, open ‘C:\Users\HP User\workspace\my_website\views\header.ejs’
at Error (native)
I’ve racked my brains trying to figure out this problem and I haven’t found any helpful solutions yet. I don’t have a file called header.ejs anywhere and I’m confused as to why it is searching for that. Also, the class names in my ejs files have yellow squiggly lines under them and have “undefined css class” warnings.
same here. I cant get the tutorial for node JS :S
Greate explaination. Thank you so much
This is very great examples .good can we get more examples based on bootstrap,express,nodejs please let us know
Hi, thanks for that awsome tutorial!
I’ve just followed it and I am now trying to implement socket.io. Therefore I would like to seperate the call to a js function in a file of the “routes” folder :
in that client.js file I got :
(function($){
console.log(‘test’);
var socket = io.connect(‘http://localhost:3000’);
})(jQuery);
Unfortunately, eclipse is telling me that the jQuery variable is not defined.
If I write those lines directly in index.ejs, the script is successfully loaded. There must be a problem in getting jQuery working in a seperate file, but I can’t figure out which one. Maybe a specific eclipse issue?
Any idea? thanks!
Hi, make sure you have installed jQuery as dependencies like “npm install jQuery”
Then you need to load it on top of your client.js file like:
Var jQuery = require(‘jQuery’)
Documentation here:
https://www.npmjs.org/package/jQuery
hmm…i am bit lost. after i followed yr direction. i cannot run the navigate to /about. it tells me, Cannot GET /about.
I wondering if i added var about = require(‘./routes/about’); under the var app = express(); and then
added app.get(‘/about’, about.about); under the app.get(‘/users’, user.list);
should it works? I tried but turns out cannot get/about? any idea?
you should put the following just before the “http.createServer(app)” function
var about = require(‘./routes/about’);
app.get(‘/about’, about.about);
and it should work, download the source code and have look at the app.js file structure
thank you for yr helped. btw: can i use
instead of
it doesn’t work? i am confused. any advice would help.
thx!
hmm…i am bit lost. after i followed yr direction. i cannot run the navigate to /about. it tells me, Cannot GET /about.
I wondering if i added var about = require(‘./routes/about’); under the var app = express(); and then
added app.get(‘/about’, about.about); under the app.get(‘/users’, user.list);
should it works? I tried but turns out cannot get/about? any idea?
great tutorial, very helpful… thanks!
Just a quick fix… put
app.get(‘/about’, about.about);
after the createServer method. App hasn’t been defined yet
if you put it before.
Instead of manually adding Content-Type for .ejs, why not install the Web Page Editor for Eclipse?
Details for Eclipse Luna: JSF Tools – Web Page Editor 2.6.0.v201312111052 org.eclipse.jst.webpageeditor.feature.feature.group Eclipse Web Tools Platform
My mistake, the Web Page Editor plugin has the HTML content type, but does not include the *.ejs file extension.
Yeap that’s right the Web Page Editor was developed to support editting HTML and JSP file, JSP files work completely in different way 🙂
this is greate, thanks